
Quick Preserved Lemons
Servings: 20 servings
Calories:
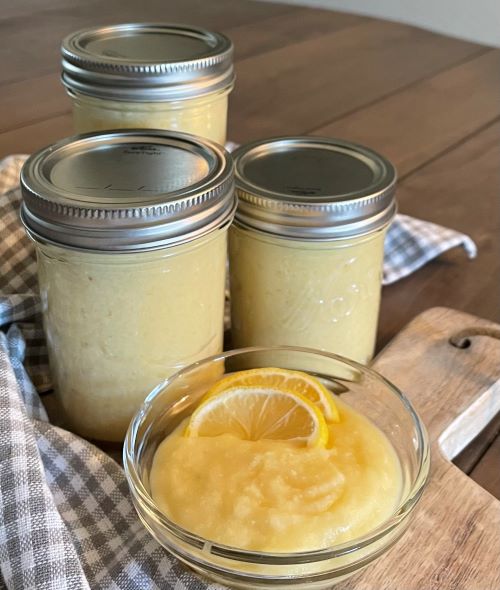
A hint of lemon across a variety of recipes ranging from sweet to savory will take your cooking to a new level. This easy gluten-free citrus condiment is made of fresh lemons & salt. Why spend the money to purchase when making it couldn’t be easier. Boil thin slices of lemon with fresh lemon juice and salt, Then blitz them in a food processor or blender until you have a thick, spreadable paste. It keeps for weeks in the refrigerator
Print Recipe
Equipment
- Medium sauce pan
- High speed Blender
Ingredients
- 1 large lemon end trimmed, sliced into 1/4-inch-thin rounds, seeds removed
- 4 tbsp lemon juiced
- 1 teaspoon salt
Instructions
- Rinse lemons, trim off ends, and cut into 1/2 thick slices.
- Combine all ingredients in a small saucepan set over medium-high heat. Simmer until salt is dissolved, 1 to 2 minutes, then lower the heat to medium-low. Cover and cook until the lemon rinds start to look translucent, stir several time to avoid burning or scorching, about 12 minutes.
- Set aside to cool slightly, then transfer to a food processor (or blender) and blitz until smooth and thick. Add a tablespoon of water at at time if you need to thin out the mixture; the result should be spreadable paste.
- Transfer the preserved lemon paste (at room temperature) and pack well in an airtight jar with a secure lid. Cover and keep in the fridge for up to 2 weeks.

- Make a double or triple batch and give canning a try.

Canning
- Remove lids and rings from jars and place in pot. Fill pot with water to cover, place a lid on the pot and bring it to a boil..Remove the jars from the canning pot (pouring the water back into the pot as you remove the jars) and lay them out on a clean towel on your counter.Carefully fill your jars with the preserved lemon. Leave between 1⁄4 and 1⁄2 an inch of headspace (that's the room between the surface of the product and the top of the jar).Wipe the rims of the jar with a clean, damp paper towel or the edge of a kitchen towel. Apply lids and screw the bands on the jars to hold the lids down during processing.Carefully lower the filled jars into the canning pot. You may need to remove some water as you put the jars in the pot. A heat-proof Pyrex measuring cup is the best tool for this job.Once the pot has returned to a boil, start your timer for 15 minutes. The length of the processing time varies form recipe to recipe. When your timer goes off, remove the jars from the water bath promptly. Place them back on the towel-lined countertop and let them cool.The jar lids should begin to ping soon after they've been removed from the pot. The pinging is the sound of the seals being formed and the center of the lids will become concave as the vacuum seal takes hold.After the jars have cooled to room temperature, remove the bands and check the seals. You do this by grasping the jar by the edge of the lid and gently lifting it an inch or two off the countertop. The lid should hold fast.Once you've determined that your seals are good, remove the rings and wash the jars well to remove any sticky residue. Store your jars in a cool, dark place (with the rings off, please) for up to a year. Jars that don't seal can be refrigerated and used first.
Notes
This makes a delightful hostess gift or special addition to any gift basket.